Article by: William G.
Leo asked me to come up with a course to send out to members that they could use as a practice session. He asked that it be kept short, and focus on what I thought were necessary skills. Those are the only parameters he gave me. It took me approximately three minutes to write the course. It was what happened after that took a little more time, since I put forth some decent effort anytime something is important to my friend. It seemed like as good a subject as any to describe the process I use when designing something like this. If you are interested in the creative process you can read the entire article. If not, skip to the end for the course.
Any time I sought the counsel of Jeff Cooper (no, I do not think I am capable of writing an article that doesn’t mention him) about technique, tactics, equipment, he would ask me two questions:
What are you trying to accomplish?
Yes, but is it practical?
Those two questions drive my thought process on these matters.
What I was trying to accomplish:
A course you could shoot twice with one box of 50 rounds of ammunition.
That would encompass the basic probable skills required in defensive encounters a Peace Officer or Citizen may find himself in, against a solitary opponent offering the threat of deadly force or great bodily harm.
That would utilize a target that was commonly available, and could be easily modified to a more realistic vital zone area.
That would work around common firearms that have a magazine capacity of at least 8 rounds to allow for usage of what the majority of people may carry.
That allowed for an honest assessment of ones chosen gun and support equipment.
That had reasonable time frames that consider legal, moral, ethical assessment of a threat, number of required rounds on target to solve the issue at hand, and holds one accountable to a degree of actual marksmanship needed to accomplish the life saving task.
That can be used as a tool to see where you need to improve accuracy, speed up, or slow down.
Yes, but is it practical?
This is not a blast away as fast as you can course. There seems to be a trend of thinking the faster you can shoot, the more street survivable you are. Street survivable is highly important. So is court survivable. The two can go hand in hand. Competition driven need for speed leads to some really bad decisions, and bad shoots, not to mention missed shots, and other horrible consequences. This isn’t to say that you can take your time, you have the rest of your life to solve the problem, but fast doesn’t always equal good or righteous.
All hits are not equal. The first person to get the first GOOD hit tends to be the winner. “Combat accuracy” needs to have a solid definition assigned to it. It does not mean any hit on target. It means hits into specific areas that are likely to, or actually do, cause the deadly force threat to cease their actions in the quickest amount of time. A stomach shot, 3” to the left, and 2” below the navel is not going to have the same effect as one dead center of the mammary glands. Just like a shot through the right lower canine tooth will not have the same effect as one through the tear duct.
Having those things in mind, I penned the course, but with no time frames. That comes later.
I went to a small private match with a group of friends, and at the end of the match, I ran them through the course. I recorded each one’s times on each stage, then scored the targets. They had some advantage of having been “warmed up” from shooting the match, but I gave them no hint of what the course was, or what they were doing, other than giving me data. I shot each stage as an example, and then had them do it one by one.
For the first group, people shot the following guns:
Sig Mk25 w/ Romeo 1 red dot
Taurus TPX (22lr, the shooter recently had hand surgery)
1911 Government in 45 Auto
1911 Commander in 9mm
G47 (wither Performance Trigger) and Aimpoint COA
G19x (with Performance trigger)
Dan Wesson DWX
Sig M18 w/ M17 red dot
Two used a Safariland GLS, I used an Alien Gear Rapid Force Level III, and everyone else used an open top kydex holster with no cover garment.
The next day Big Dick (now a GALEFI legend) and I went to my range to get some more data. We both shot cold that day, which is a little more of a true test of skill, generally. Once the first time is out of the way, subsequent times that day are not as relevant in assessing the overall. Though you can still get good data, if you pay attention.
For the second range session I used:
1911 Government in 45 Auto in OWB Leather
Sig P365 in IWB Leather
Smith and Wesson 351c in a pocket holster
I shot from concealment under an untucked shirt.
Big Dick used:
Sig M17 Legion in IWB leather (he shot it twice in a row with that)
Ruger Red Hawk 45 Long Colt in Leather Cross Draw
Smith and Wesson 351c in a pocket holster
He shot from open with no concealment garment.
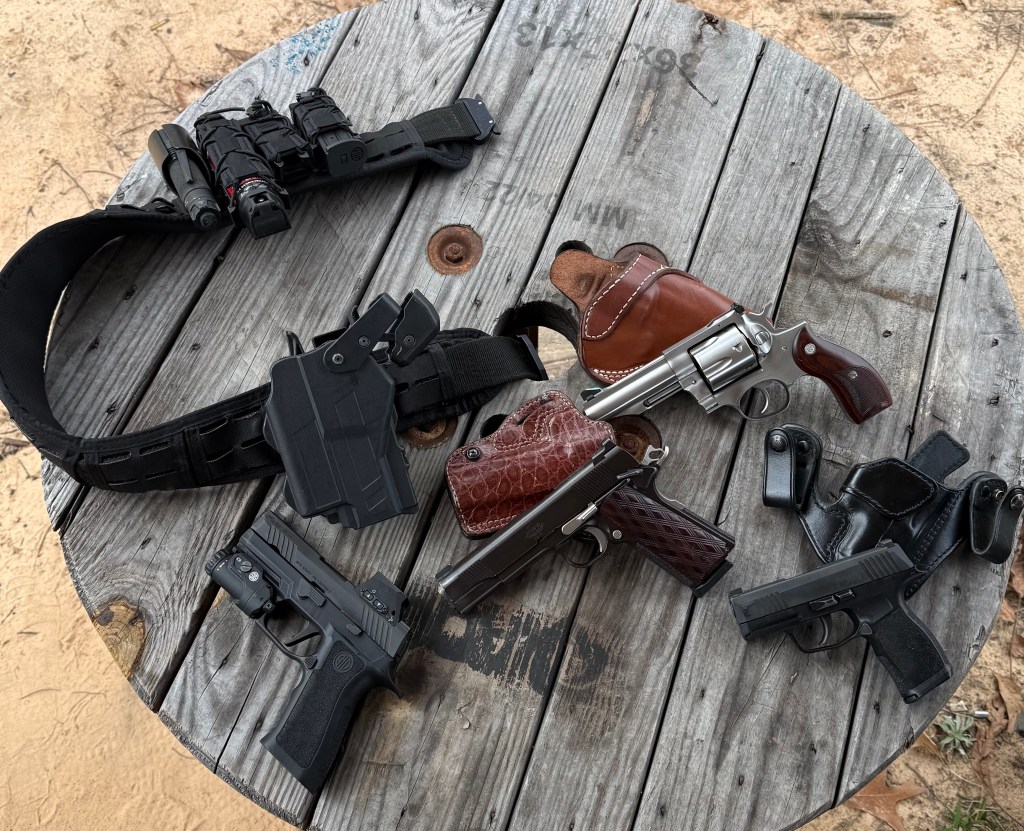
(Some of the guns from the second day.)
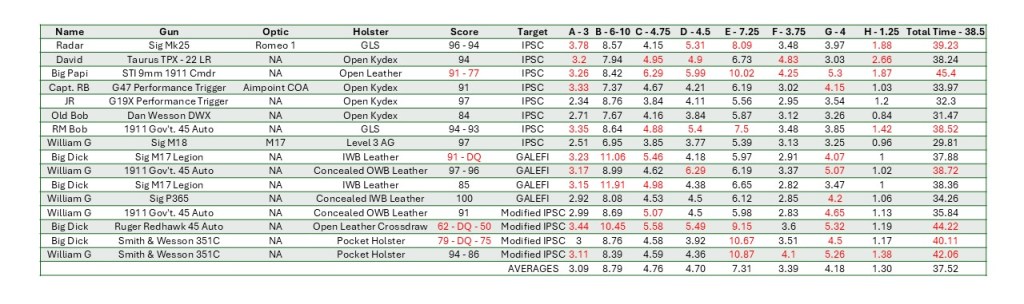
I took everyone’s times and scores, and entered them into a spread sheet. From there I got averages for each stage, and averages for overall times. After seeing an overall picture, I took a step back and looked at the totality of the circumstances. Peak human reaction time is .25 of a second. Peak, and usually for someone that practices a lot, or just went through a 2,000 round, week long course. Average human reaction time differs. The times I considered took into account what you can do in real life, over a variety of circumstances such as if you are tired, sick, hurt, distracted, got debris in your eye, are in the middle of taking a bite of food, got a pone call saying someone you cared about was just in an accident, and when you were not prepped and ready knowing exactly what problem solving skills you are about to have to use; the things that happen in real life. So, here are the time frames I used as a base:
.25 to hear and start reacting to the buzzer.
1.5 seconds to first hit.
.50 split between shots in the same area.
1 second between transitions to different parts of the target.
Those are the basis of the times. Some stages (B, E, and G specifically) had slightly longer time frames. B because of the way I required it to be shot. E because there was a slide lock reload, and G because it was a little further than the other stages. All those things factor into reaction time, articulable decision making between shots, and distance.
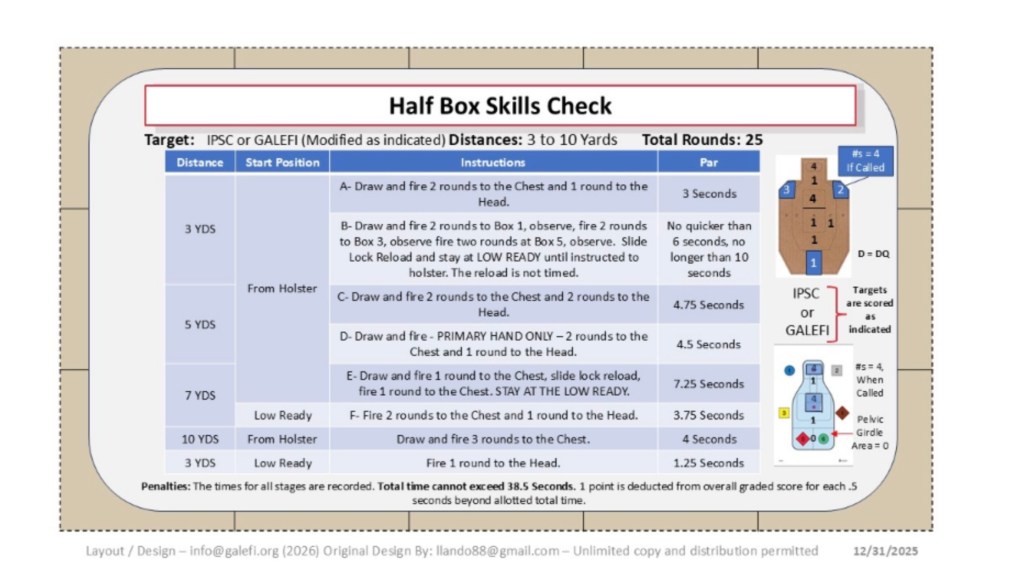
Considering the averages and raw numerical scores and the breakdown of reasonable reaction times, I developed a target goal for the overall time. DVC is Jeff Cooper’s abbreviation for Speed, Power, and Accuracy – all of which are required to prevail, and are equally important. With that in mind, I built in penalties to encourage a balance of all three requirements. Every half second over the goal time of 38.5 seconds results in a removal of 1 point from the final score. I am stringent on this as I do not give a break on any lower fractions. If you shoot it as little as 1/10th of a second over, it is a point deduction. (38.51 is minus 1 point. 39.02 is minus 2 points, etc.)
Both the IPSC and GALEFI Q are easily obtained targets. I am not fully satisfied with the scoring zone on either, so I reduce them as follows:
IPSC Head:
A = 4 points
B = 1 point
IPSC Body:
I draw a line an inch under the A. From there up, inside the A zone = 4 points
Anywhere else in the A/C zones = 1 point
The 3 hand drawn boxes (when called) = 4 points
D other than the 3 additional hand drawn boxes = DQ of course
Any round off target = DQ of course
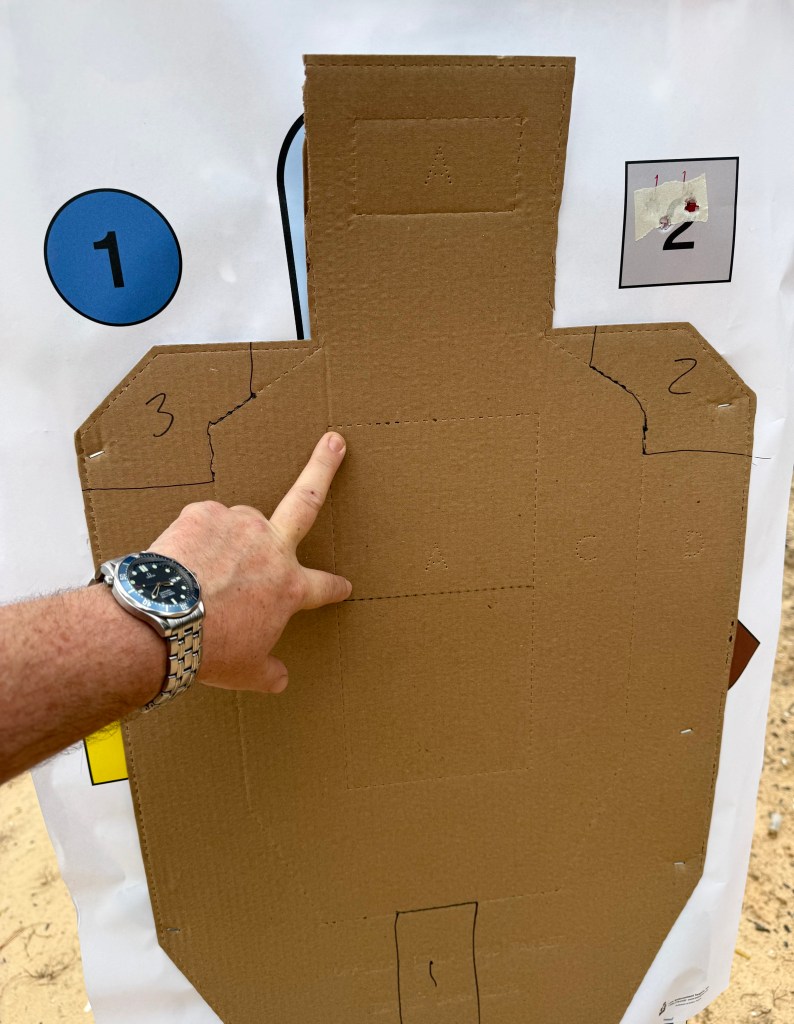
(IPSC Target, Modified)
GALEFI Head:
Inner box = 4 points
Outer Head box = 1 point
GALEFI Body:
There is a 3×5 inner chest box. I draw a vertical line on each side up to the top of the overall chest box and that = 4 points
The rest of the chest box, and the overall silhouette down to the perforated line of the pelvic girdle = 1 point
The shapes (when called) = 4 points
Any round off target = DQ of course
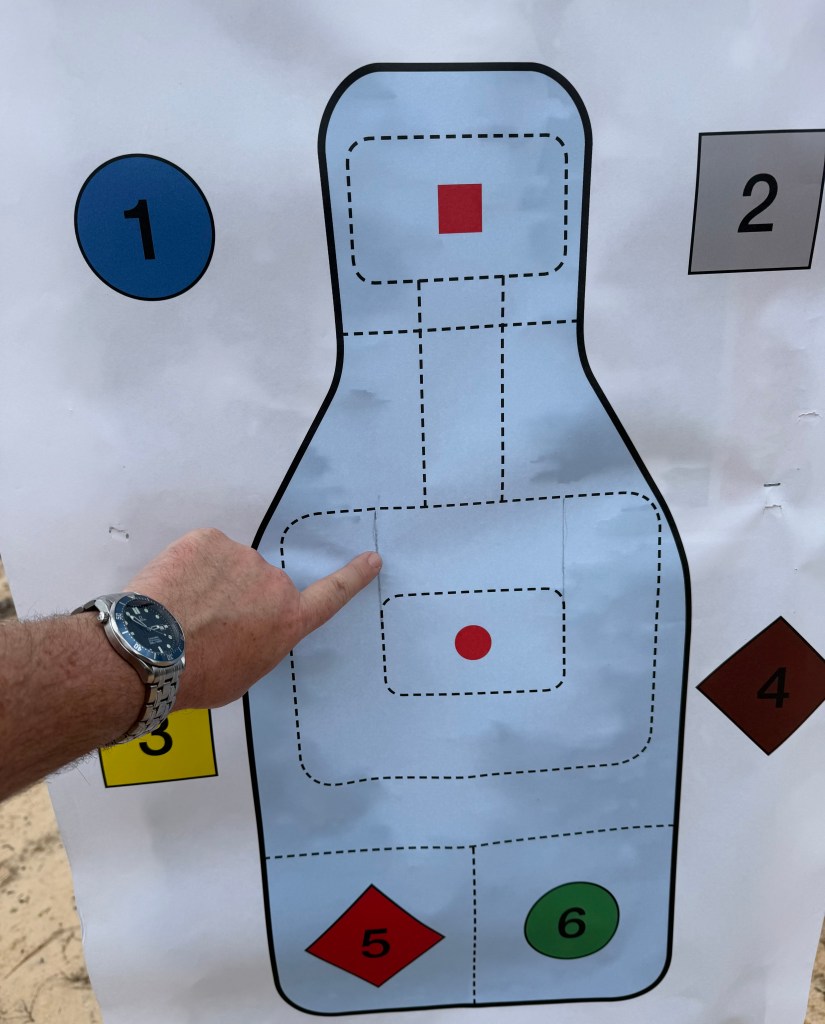
(GALEFI Q , Modified)
Here is the course, with descriptions of the why behind each stage. An abbreviated version without the whys will be included at the bottom of the article.
3 Yards
(A) – 3rds total, 3 seconds
Draw and fire 2 rounds to Chest, and 1 round to Head
Standard failure drill. When a reasonable amount of chest shots fail, and the head is available, it becomes the reasonable target.
(B) – 6rds total, no quicker than 6 seconds, no longer than 10 seconds
Draw and fire 2 rounds to box 1, observe, fire 2 rounds to box 3, observe, fire 2 rounds to box 5, observe. MUST pause to observe between strings of fire of 2 rounds each. Slide Lock Reload and Stay at LOW READY until told to holster. Reload is not timed.
Search for the target, and fire 2 rounds. Lower to an actual street viable low ready (Guard), assess, find that the threat is still active, engage with two more rounds, go to low ready, assess, find the threat is still active, engage with two rounds – ending engagement. Shooting until there is no longer a threat does not always look like a mag dump. Being able to articulate why you did what you did is a legal, moral, ethical requirement, and is not weak, nay, it requires a higher degree of care and much more skill than mindlessly throwing rounds into the abyss. There are times a threat will change positions, move, and present less of a target. Any of those actions, outside of your control, require assessment, and changes in tactics, aiming locations, speed of delivery, and number of rounds. Train for the reality of critical thinking. Do not mindlessly dip the muzzle and pop back up. Switch up which boxes, and in which order you shoot this stage to add a hint of realism.
5 yards
(C) – 4 rds, 4.75 seconds
Draw and fire 2 rounds Chest, and 2 rounds Head
The chest is presented as the most practical target on this stage to start. Those rounds fail, and the head becomes an available target. There when more than one round to the head is legal, moral, and ethical. Sometimes we miss. Sometimes the round hits the teeth, jaw, upper temporal lobe, etc. – places that do not shut the threat down, or the bullets glance off. You can justify shooting more than once to the head under certain circumstances.
(D) -3rds, 4.5 seconds
Draw and fire PRIMARY HAND ONLY 2 rounds Chest, and 1 round Head
You may have been injured in you support side, or holding onto something to keep balance, or fending off a second attacker, or holding someone back, or….. There are times when we only have one hand available. Just because you are at a disadvantage, does not mean that the threat cares. You may gave to perform a failure drill with only one hand.
7 Yards
(E) – 2rds, 7.25 seconds
Draw and fire 1 round to the Chest, slide lock reload, fire 1 round to the Chest. STAY AT THE LOW READY
While slide lock reloads are way on down the list of my hierarchy of probably skills, they are possible and a reality. Doesn’t hurt to keep sharp with them, especially if you run a single stack without a mag funnel. Why such a long time frame on this one? Reality. Just because you ran dry doesn’t mean you should immediately blast the round you just manually chambered. You still have to assess the validity and immediacy of the threat prior to firing. Sometimes the threat is no longer a threat. Sometimes the threat moved locations. Lots of reasons to take a brief bit of time to confirm what you are shooting, where you are shooting, and why you are shooting. Yes, it is your life you are trying to save – maybe someone else’s too. Yes, you need to be reasonably quick. No, you should not be so quick that you end up in federal prison because some internet guru said you got to be quick or dead.
(F) – 3rds, 3.75 seconds
Fire 2 rounds to the Chest, and 1 round to the Head
We have discussed the reasons for the Failure Drill. They apply at multiple distances.
10 Yards
(G) – 3rds, 4 seconds
Draw and fire 3 rounds to the Chest
The further we get from the target, the longer it may take to get good hits. The longer between shots it may take to get good hits. While it is absolutely possible to make a head shot at 10 yards, that is asking a lot for unknown circumstances. If you can without question, that is great. Most have a lower chance of hitting a moving head, especially in adverse lighting, or in crowds, or in the cold, rain, etc. than they do hitting the chest. Practicality and probability is that a chest shot is safer to take at 10 yards. It is all situation dependent. You can practice the head shot past 7 yards, and you should. However, being reasonable about your likely required skills nods toward the chest. Sometimes 2 rounds will not stop the threat, and the head isn’t an option. In that case a third round to the chest is the smart or only option. Maybe 4. Maybe more. We can what if this all day long. 3 is a good number for this distance for an overall skill to have. Especially at a pace that gets solid upper chest cavity hits where the aortic valves and spinal column between the nipples resides
3 Yards
(H) – 1rd, 1.25 seconds
From LOW READY, fire 1 round to the Head
There are times when an immediate head shot is legal, moral, and ethical. Threat is visibly wearing armor, they have a hostage, they have announced or are visibly wearing a bomb vest, they are at an angle only the head is presented as a target, etc. Train for this eventuality so that you are sure in your mind you can do it, through skill and knowing the law. This particular ending to the course is also psychological. You are closer with a higher probability of a good hit. You are at the ready, which also give higher probability of a good hit. The last round you fire in your session will stay in your subconscious, so it should be a good one that builds confidence – something I learned long ago from my friend and colleague Claude Werner, The Tactical Professor. (https://thetacticalprofessor.net/)
Use this as a tool. Adjust the times to suit your needs (just do not get overly quick, but don’t fool yourself by being too slow). Be honest about what your chosen gun and gear can do in your hands. Everyone has bad days, so don’t just shoot it once. Space it out. Record your performance. Make notes about how you felt physically, and mentally, the weather and lighting conditions, etc. Take the totality of the circumstances and make an informed decision.
As an example, I have had some pretty bad neck and back pain lately, and my right wrist has been hurting a lot more than normal. My eyes fluctuate between needing a dot or not, though more than not. I did not do as well with my beloved 1911 in America’s caliber, and it showed. The numbers do not lie. I did better with a P365, if only marginally by time, it was much better by score. The score difference between the iron sighted P365 and PMO equipped P320 (yes, I shoot one of those from time to time. No, I do not want to write a dissertation on my views on the platform in this article, though I am sure I will make some observations at some point. There are still a huge number of them in LE holsters, and it behooves me to teach with what the agency that requested me is running) was negligible. What was glaringly different between the two was not the size or the dot, it was the holster. An exposed duty holster (if the shooter knows how to run it) will always be faster than a truly concealed gun. Having that in mind, it would be a more accurate assessment of my skill between the two if I ran the 320 with PMO from like concealment to the P365. I may get around to that, but the testing of the HK CC9 with Holosun 407k Gold Dot is about to commence, and that will take up most of my range time for the first half of 2026, along with a HK VP9x with a Trijicon RMR HD, and brand new exotic duty holster.
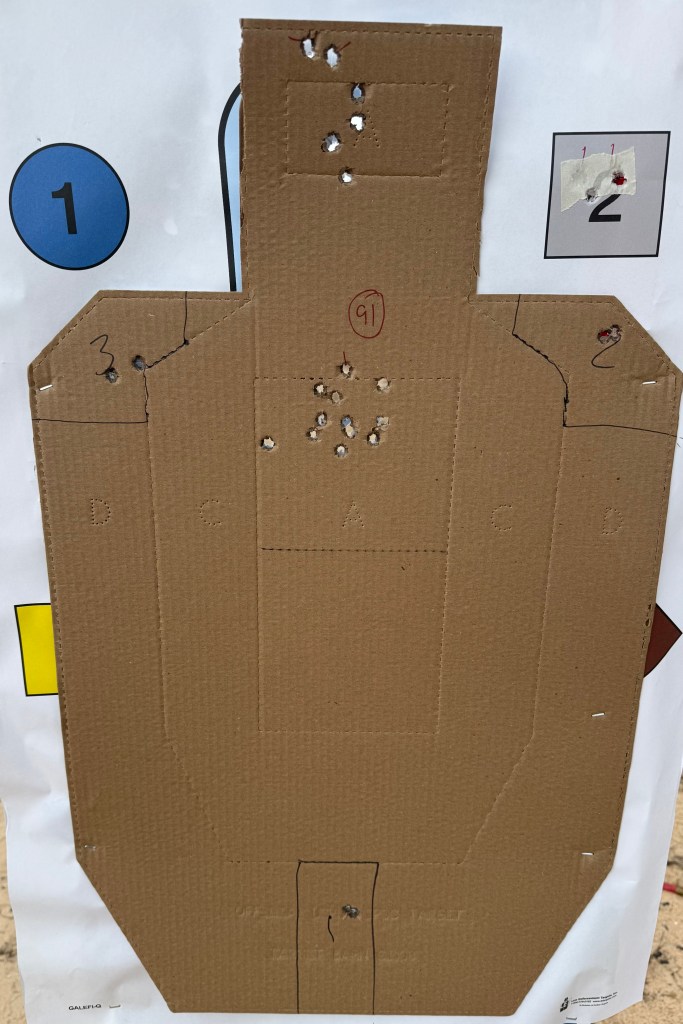
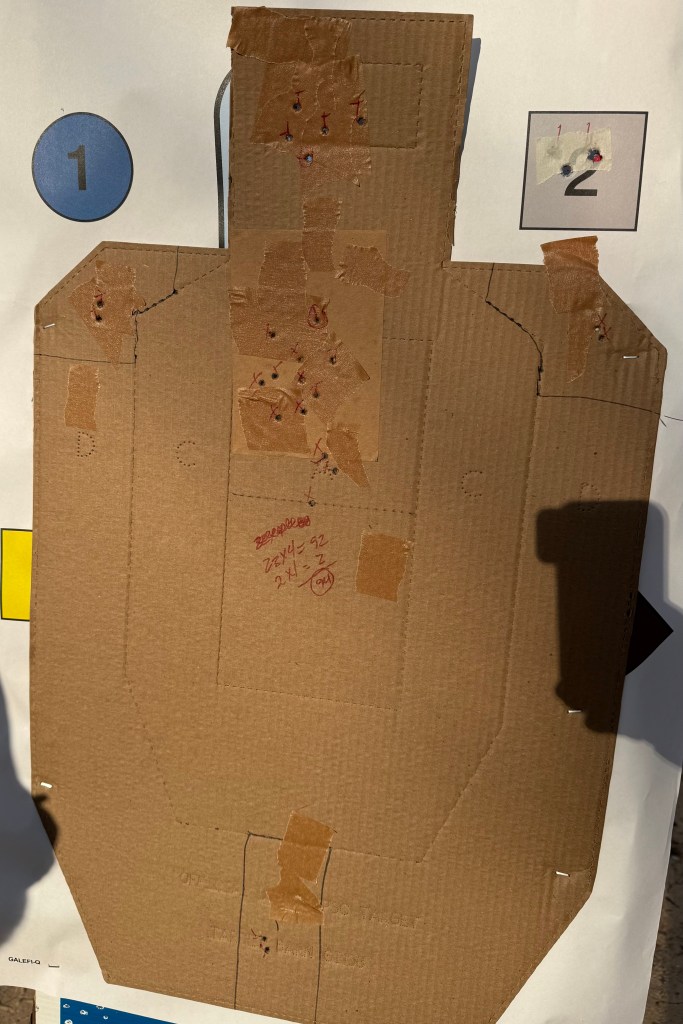
I have included pictures below of my targets from the 1911, and Snubby 22 magnum. I retape targets, a lot most days. I think that the overlaying patterns add a good distraction, causing you to have to do more to observe, just like on the street where someone is wearing clothing that bunches, has varying patterns, and there are natural shadows. I also like to make targets different heights, and put them as sometimes slightly off, and sometimes radical angels.
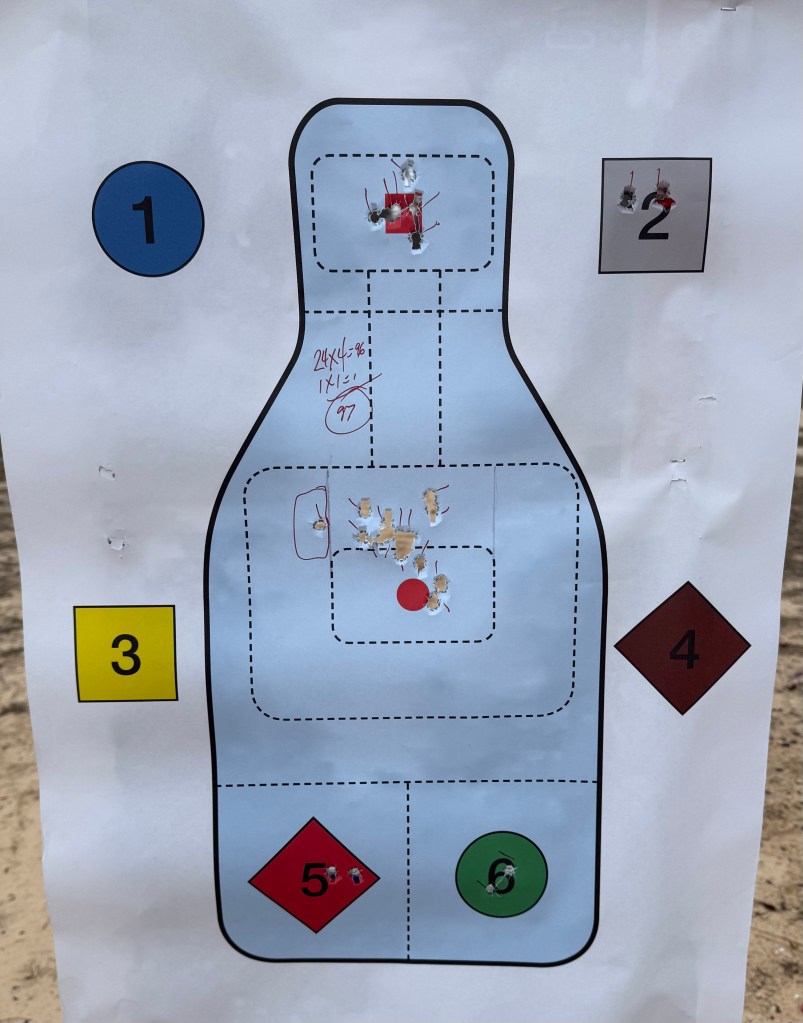
(GALEFI Q shot with 1911 in America’s Caliber)
(IPSC Modified target shot with same 1911.)
Notice how the patterns are different from each other on the targets. There are several factors. The contrast of colors, the shapes and sizes of the scoring areas, etc. can all have an effect. I shot the GALEFI target first with the 1911. Then a GALEFI target with the P365. Then the IPSC with the 1911. We went to the range in the afternoon, and this was toward the end. Being tired and in some pain can affect your performance. At some point you get diminishing returns. Not making excuses, but being honest, and holding yourself accountable is important. As well as, knowing when to pack up for the day. Still cannot question that I did better with the P365 though.
(IPSC Modified target shot with 22 Magnum pocket rocket.)
Just a note that revolvers are more tolerant to neglect if they sit in a nightstand than they are from neglect of maintenance. My friend had not checked the things on revolvers that need to be checked. Side plate screws, grime under the extractor start, etc. The ejector rod had come loose, and I noticed the trigger getting inconsistent in a string of fire. Next was the reload stage. I could not get it open, and had to slap the side of the cylinder, reloaded and finished the drill. I stopped before the next stage, and sure enough, the ejector rod was almost all the way backed out. I tightened it up, and finished the course. That is something to look for if you carry a revolver. They can back out through vibration of walking around over the course of enough time. Know your tools, inspect them, and maintain them if you carry them, even if they are not shot a lot (his are though). You have to stay on top of these kinds of things – which is a good idea for an article, maybe? What goes wrong with guns, what to look for, and how to prevent problems before they occur. I will work on that one.
Drill Data – Download Spreadsheet to View Data
I hope this gives some insight into how I go about setting up a drill or course of fire. Maybe you can use it as is, modify it somewhat, or even as a guide to roll your own. One thing to keep in mind is that one course will not cover everything. It is important to have one that is a general skill builder/test, which you shoot primarily. However, you should have others that test other skills as well. For example, a hostage rescue element should have one with primarily head shots, and bystanders. A school resource officer needs on with a lot of bystanders at different heights, and some distance shots. Someone assigned to interdiction probably needs one with 2-3 targets. If it is a UC unit, they would need to do a lot of focus on extreme close range, retention shooting, and asymmetric positions. As you hear me blabber all the time, one size does not fit all. I may write some more courses based off the above examples at some point, including a super course for the die hard crew. It will be interesting, to me at least.
Thank you for taking the time to listen to me ramble, and since I missed an article on Christmas this time – Merry Christmas to All. God bless us, Every One. May your 2026 be the best 2026 yet.

Leave a comment